Wednesday, December 16, 2009

Making Magnets


I just finished making a big batch of these lovely magnets to give to a few people on my Christmas list. I really like the way they came out. I actually feel compelled to make about 30 more because I love the way the entire group looks on my fridge (so much prettier than plastic letters and numbers!) I have seen these magnets at bazaars and decided to give it a whirl. They are functional and can be given to just about anyone on your list (who can't use a pretty magnet?). They are inexpensive to make, you need only fabric scraps, glass bubbles, magnets, Mod Podge and a glue gun. They are small and easy to travel with or to mail, and they are so pretty! Does that make them the perfect gift to make? I think so.


So how do you make these?


  • Gather your supplies--Mod Podge, large(about 1")glass bubbles, fabric scraps, paint brush, magnets, glue gun. You can find all of these supplies at a craft store. The glass bubbles are in the floral section.


  • Cover your workspace. I don't have an art studio (sigh) so I am constantly creating mobile work spaces. I used a cookie sheet covered in wax paper for this so that I could grab it when I had a few minutes to work, and put it out of the way when I needed my kitchen to be clutter free.


  • Make sure your bubbles are clean and dry. I noticed that many of them had imperfections on the backside that would interfere with the design. So I weeded those out or used them with a fabric that complemented the scar.


  • Lay the bubble on a fabric scrap and trace. Cut it out so that it is touch smaller than the line you traced (just inside the line).


  • Paint the flat side of the bubble with Mod Podge and press the fabric circle onto it, pressing firmly and making sure there are no air bubbles. Coat the back with another coat of Mod Podge, being sure to seal the edges.


  • Allow it to dry, then trim any edges that are not neat, then apply another coat of Mod Podge to the backside.


  • When it is dry, use a glue gun to secure a magnet, pull off any glue gun strings, wipe it clean and you have a very pretty magnet!

Sunday, December 13, 2009

Recycled Christmas Trees

Hollin made this at Sunday School this morning and I love it! What a great way to reuse liquid laundry detergent tops. The lid is stuffed with coiled cardboard and the stem/ trunk is a coffee stirrer. The kids stuck stickers to a paper cutout and then taped it to the coffee stirrer.

So simple and she loves it.

Sunday, December 6, 2009

Snow Family

Here is another one from the Christmas box. Again, I don't have pictures of the process, but I may make a few more this year (I believe I have a baby or two to send out) and if I do I will post instructions. I started making snow families about 10 years ago--I gave them as gifts to friends and family. A cute personalized gift that I hope the recipients enjoy every year. They are paper mache over newspaper and masking tape armatures. I use white paper towels with the paper mache glue so that I do not have to paint them (saves a step and looks really nice) The carrot noses are made out of polymer clay and everything has been assembled with a glue gun. My family is in need of a few repairs (the trip from MD to AK took a toll on them). The kids love these and like to play with them. I think it is fun for them to have a "doll" of themselves. You can add little features to characterize each family member a bit more. I would like to put a princess scarf og Hollin and a truck scarf on Waylon. Nothing is ever really finished...


Saturday, December 5, 2009

Tree Topper

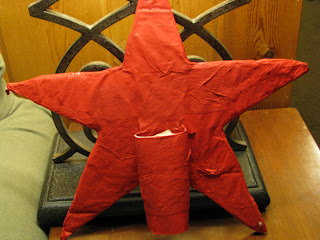
Hollin and I made this tree topper two years ago, when she was 2 and a half. We made it out of cardboard, a toilet paper tube, paper mache, some red paint, glue and little "jewels". I absolutely love it and hope it will be our topper for years to come. I still remember her chubby little hands gluing on the jewels while we talked about our new baby who was to arrive after Christmas. The best part is that she still considers it a masterpiece--the perfect topper to our tree. I don't have photos of the process, but I will describe it. Let me know if you need more detailed instructions to make one for your tree.
  • First cut a star out of a piece of sturdy cardboard. Glue a toilet paper tube to the back the tape it on securely with masking tape.
  • Tear a white paper towel into strips. Mix up some paper mache glue. You can do this several ways, I suggest using Elmer's Art Paste for paper mache.
  • Cover the entire thing with 2 layers of wet (with art paste), but not dripping, paper towels and allow to dry.
  • Paint.
  • Decorate.
  • Put on your tree every year:)

Thursday, December 3, 2009

Noodleflakes

This noodleflake ornament evolved from the snowflakes in my last post. After making sparkly snowflakes, http://http//alwaysarting-colorcolorcolor.blogspot.com/2009/11/sparkley-snowflakes.html I thought I would try to make something similar for the Christmas tree. This is what I came up with. These were made by gluing uncooked noodles to a plastic yogurt lid, then popping it off once dry, adding a bit of glitter and a ribbon...So pretty!


The key to making this ornament is to use a TON of glue. Squeeze the glue into the lid so that the entire lid is coated in a layer of glue. Then press the noodles into the glue, really pack them in tightly. I tried making these in various patterns and found that unless they are packed together tightly they will fall apart. So, I suggest making a round noodleflake. Allow the glue a day or 2 to dry, then simply pop it out of the lid. Add some glitter or glitter glue, string a ribbon through a hole and put it on your tree.


You can glue first and paint later, or paint first. I like to paint first. Painting the noodles this way is really fun. Choose your color. We used white and a tiny touch of blue. Squeeze it into a container with a lid.

Add noodles, close the lid, and let your little helper shake it up. You can also place a blank index card inside and let the paint and noodles "paint" the card for you. It makes a nice design.

Once the noodles are coated in paint, spread them out on some waxed paper to dry or just get started. Using wet noodles will result in messy fingers, but it can be done.

Don't forget to add glitter. Brush with glitter glue or with glue and sprinkle on the glitter.

Wednesday, December 2, 2009

Sparkley Snowflakes

We moved into our new house, had a wonderful visit from Grammy, and then my husband left for what will be almost 4 weeks (12 days to go!) The shock of it all has kept me from the computer, but I think it is safe to say I am back and in full on holiday art mode! My art space is starting to take shape in our new house and I can finally access all of our materials. It is not perfect yet, but it is going to be. We have made, are currently making, and will be making tons of fun projects. December always creeps up on me and leaves our house in a crafty disarray. We have glitter on the counters, gingerbread in the oven, and popsicle stick creations on the table. The first thing I want to share is a beautiful little snowflake made with wagon wheel pasta (uncooked of course).


To make this you need:


  • card stock


  • glue


  • marker


  • wagon wheel pasta (uncooked!)


  • white tempera paint


  • paint tray and brush


  • white glitterWe are fortunate here in Alaska to get a close look at snowflakes pretty regularly. We have been able to see that they are all different and that they have symmetrical patterns.

Start by drawing a simple snowflake shape on white card stock with a marker.


Next, glue the pasta over your lines.


Now sing a song, go outside, have a snack--do something for at least 10 minutes to let the glue set.


Paint with white tempera, brush with glue, sprinkle with glitter, shake off excess and you have a very lacy and very lovely snowflake.


Doing this with a group will result in many different designs. I must warn you that you will likely see more wagon wheel pasta projects in the coming weeks. I have never been much a the noodle art type, but I have been having fun adapting this activity.

Thursday, November 12, 2009

Moving In

No pictures with this post--I am not sure where the camera is! This has been a very busy week. We have moved into our new home after more than 2 months in a hotel. We still have lots of unpacking and organizing ahead of us. I keep eyeing the boxes labeled "art", but I am trying to stay focused on things like towels and dishes. It won't be long though, I just cannot take it! I have way too many projects on my "want to do" list. Holiday projects, curtains, murals, preschool art group...not to mention rediscovering the materials that have been in storage for 3 months. I have actually been losing sleep (in a good way) thinking of all the creating I plan to do in the coming months.

Be on the lookout for some snowflake crafts this weekend...

Thursday, November 5, 2009

Best Use for Halloween Candy

There is really only so much candy a 4-year-old can (or should) eat. Why not make some art with all of those pretty little colors and shapes? I rinsed out a little carton of cream and painted it white (actually Hollin painted it). We used acrylic, but tempera would work well too. While the paint dries, open up lots and lots of colorful candy--everything that does not get used gets tossed, so open more than you think you need :)
Then let them glue away with some white glue. You have to do one side at a time to allow the glue to dry. I think this would be fun for older kids to do after reading Hansel and Gretel, or somehow tied in with a game of Candyland. We kept it simple, but you don't have to!

Sunday, November 1, 2009

Happy Halloween!

We had so much fun decorating and making costumes for Halloween. I love that Hollin is old enough to really get into it. She was so enthusiastic--essentially going crazy with joy--while we decorated the hotel room, carved pumpkins and planned costumes. Waylon picked up on the excitement too.


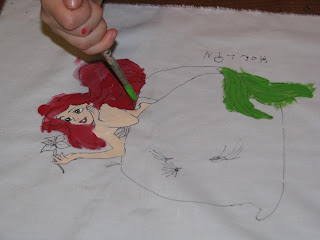
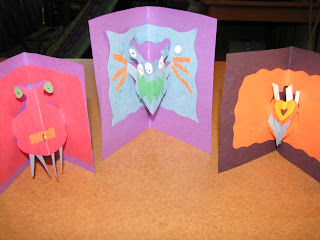
Here is Hollin decorating her trick-or-treat bag. She wanted a pink plastic princess pumpkin that we saw at the grocery store...we made our own princess bag instead. I drew a picture of her favorite princess on a piece of fabric and she painted it. Then, I sewed it to a pre-made reusable grocery bag. Sadly, we left it at home for the big night of trick-or-treating, it just never made it into the bag of costumes, mittens and goodies. We ended up borrowing a pumpkin bag from a friend and did not miss our mermaid bag at all (now we have a very cute shopping bag). We did make Ariel leaning on a jack-o-lantern--if you look closely you can see the face. Pop-up cards for the family!


Hollin really wanted me to wear a costume, so I made this funny looking jack-o-lantern from an orange sheet. She painted the face for me. I made it nice and big so that it would fit over my coat. Every year I wish for something festive to wear for Halloween--now I am all set!


We had so much fun decorating our hotel room window. A friend gave Hollin the orange pumpkins, I cut our ghosts and bats and she made faces and stuck them to the window. The entire family got into the monster making. This will hardly put us on the cover of a decorating magazine, but that is not the point!


Hollin wanted to be Dorothy and we thought Waylon would make a cute cowardly lion. I can take no credit for his costume, other than finding it for $5 at a consignment store. I made her little jumper--which she is still wearing today, the day after Halloween.


Last week I realized that there would be no way she would be able to wear her Dorothy costume trick-or-treating in Alaska. She would need boots, snow pants, a jacket and hat--all of which would cover up her cute little outfit. So we thought and thought about what costume she could wear over her snow gear. The ice-cream cone was her idea. It was very warm--good thing because it was about 8 degrees!


I just love the faces she made on the clementine "pumpkins" below!


Time for a piece of candy.


Wednesday, October 28, 2009

Pumpkin + Markers


Who would have thought something so simple could occupy these two for so long! Markers, wipes and a pumpkin. And we can still paint it later as planned.

Sunday, October 25, 2009

Glue Batik

I have been having a lot of fun with this easy batik technique. A friend of mine read about this in Family Fun magazine and passed it along. Hollin and I did some experimenting at home, then we got together with some friends to make some pumpkins. I have pictures of various projects at different stages along the way. I am sure you will have no problem following along.


To do this you will need:


  • white cotton fabric (jersey knit (old t-shirt) works best)

  • white glue

  • acrylic paint mixed with water (this is not washable)

  • brushes

1. Cut some white fabric to desired size. We used an old cotton sheet for some and a cut up t-shirt for some others. We found that the t-shirt absorbed the color better and the results were more vibrant.

2. "Draw" your design with glue on the fabric and allow it to dry. We made this a 2-day project so that the glue could dry undisturbed over night.


I made the dump truck and helped with the rainbow and flowers below. But the kids had no problem making the pumpkin designs--they really came out cute.


3. After the glue dries it is time to paint. I mixed a squirt of acrylic paint with a small amount of water (1/8-1/4 cup). Mix it up and adjust until you have the color intensity that you want. You want a liquid color with no thick clumps. Paint the fabric. Paint right over the glue, it will resist the paint leaving white lines.

4. Allow it to dry, then rinse off the glue. The best way to do that is to soak it in warm water then rub the glue out. When it no longer feels slimy, it is finished and ready to dry.


I think this so pretty and has lots of potential. After we made the pumpkins we thought we should try it with blue, purple and black paint on orange cloth. If I do it I will post pictures.


Sunday, October 11, 2009

Leaf Rubbing Gift Wrap


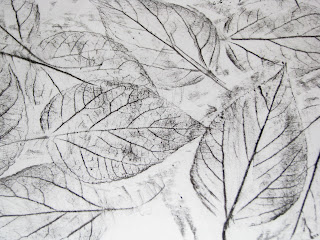
I had not intended to create a post about this, but I love it so I thought I would share. We had a little gift to wrap yesterday and we used a leaf rubbing for the papper and a leaf for the card. So simple.

Saturday, October 10, 2009

Paper Pumpkins

These 3-dimensional paper pumpkins are very cute and very fun to make--especially if you are 4. My daughter has wanted to do little else the last few days. We are growing quite a pumpkin patch. To make a pumpkin you need:


  • 4 strips of orange construction paper. You can make your pumpkins any size. We used 12" x 1/2"

  • a small square of orange paper for a base (if your pumpkin is wobbly, you can add a piece of cardboard to the bottom).

  • a green rectangle (about 3" x4")

  • about 2-4 thin strips of green paper for vines and a pencil for wrapping them around to make them curl

  • scissors

  • white glue


Start by gluing the center of an orange strip to the little orange square (base). Then continue gluing the center of the orange strips making a star shape. While the glue sets for a few minutes, cut small slits along the long side of the green rectangle, then, roll it into a stem so that the slits are on the bottom. Glue the side of the stem together. Hold it tight for a few minutes so that it does not come undone. Sing a song, count to 100, say the alphabet 3 times--then it should be dry enough to stay put. This is also a good time to curl your vines by wrapping the green strips around a pencil.

Starting with the bottom strip, start to glue the ends of the orange strips together making the round shape of the pumpkin. You might need to hold the newly glued pieces and count or sing again. Next, glue the vines on the top of the pumpkin. Fold back the little tabs you cut along the bottom of the stem and add glue to each tab. Carefully glue the stem to your pumpkin.


So cute! We plan to add some faces later. Hope this works for you!


Friday, September 25, 2009

Prints and Stamps


One of my favorite stamping and printmaking mediums can be found at a hardware store or in just about any box store in the hardware section. It is cheap, easy to find, and you can also use it to seal up any drafts around your windows and doors:) It is roll of adhesive vinyl weather stripping tape. It come in a few different widths and is usually gray. I used the 1/2 inch width for the projects below, but have used thicker ones in the past. A roll should cost you about $3.00 and a little goes a long way. You also need cardboard scraps, masking tape, markers and paper. You can use tempera paint for a more vibrant result, but I prefer the markers. My 4-year-old enjoys coloring and re-coloring the stamp. If you use paint you really need to stick to a single color unless you want to take the time to really clean between colors. (If you do choose to use paint, I recommend painting the stamp with a brush rather than dipping it into the paint).


I have instructions for making a single stamp and a printing plate below.


1. To make a single stamp, start by cutting a scrap of cardboard into a square, about 3" x 3". Use a piece of masking tape to make a handle on one side (as pictured below).


2. Cut the weather stripping tape into small pieces of various sizes and stick them onto the front of your stamp (when you unroll it for the first time be sure you do not peel it off the paper. You want to paper to be on until you are ready to stick it to the stamp).
3. Color with markers.


4. Start stamping! You will need to reapply the marker after every stamp. You can easily change color by stamping it on a scrap paper a few times to completely clean if off). This is a great project for introducing pattern.


You can also make a scene that can be printed again and again by making a printing plate.


1. Use a larger piece of cardboard. Cut the weather stripping into pieces and start arranging.


2. Color with markers.


3. Carefully turn the printing plate over and press onto a sheet of paper. Be sure to keep it steady as you press.


4. Lift it off the paper carefully.


5. Repeat, repeat, repeat! You can make only one, or a great big edition of prints.

Thursday, September 24, 2009

Finger Painting


No big projects today, just some classic finger painting. I simply could not resist posting this picture of my little man painting with his hands (and a comb). I think I will be making him a smock pretty soon.

Monday, September 21, 2009

Mouseterpiece


I love the fall. The leaves on the ground provide an unlimited number of creative activities. Today while walking along a golden path, Hollin observed that the leaves look like little mice. We collected a few and came home and created this mouseterpiece!

Tuesday, September 15, 2009

Make a Fall Tree


You can make an adorable fall tree using leaves from your yard, a few items from your recycle bin, some glue, scissors and a marker. In the past I have made trees with little ones in a similar way--only I used to have them paint the "trunk" and use tissue paper for the leaves. That is still a great way to do this project, but I needed to make some changes to fit our current situation--all of our art supplies are in storage and I have no room for tissue paper or paint. So instead of painting our tube, we covered it with the white side of a long receipt, added some detail with a marker, and used real leaves we collected outside.

1. Start digging in your recycle bin. You will need a paper towel tube, a piece of cardboard for the base (we cut a circle from a cereal box), and a long receipt or other paper that you can use to cover the tube. We made a white birch tree. Feel free to make any tree you wish. 2. Cover the tube with glue and cover it with your receipt.


3. Cut short (1/2 inch) slits along the bottom. These will be folded back and glued to the cardboard to secure your tree to a base. Cut longer slits along the top. These can be various lengths as they will become the branches of your tree.


4. Add detail to the bark with a marker.


5. Cut a hole in the tree so a little critter can have a home in your tree.


6. Fold back the little tabs you cut on the bottom of the tube. Apply a generous squirt of white glue to each tab and press firmly to the cardboard base. Have your child hold it in place while you count to 100 together. That will give the glue enough time to keep the tree in place though it will not be sturdy enough to lift and move around for a few hours.


7. Fold back the branches and glue on some leaves. Add some leaf litter, pebbles and grass below.


8. We stopped here, but may come back to this later and add some fun details--a nest, squirrel, birds, a swing, tree house, etc. You could make an entire forest--the possibilities are endless!