Showing posts with label Easter. Show all posts

Thursday, April 7, 2011

Bunny Chicks

I found an unfinished piece of wood cut in the shape of two bunnies at a thrift store the other day.
 I love what my almost six-year-old did with it. I had suggested that she use paint and she insisted on Sharpies. She was right. the colors came out great and she was able to get the details she was after. I love the way she made the bunnies peeking out of Easter eggs.
 Maybe she can do the back next year.

Tuesday, April 5, 2011

Plastic Lid Bunny Wreath

A few months ago I started a changeable wreath for our front door. The kids and I just got it ready for Easter. I cut the edge off two large 64oz plastic yogurt lids and cut out simple bunny shapes. Basically, a figure eight with ears. I cut 3 bunnies from each lid and made them various sizes. Hollin decorated their faces with colored sharpies. Waylon helped me cut ribbon. The ribbon just loops through the twigs and ties around the bunnies' necks, securing them to the wreath and giving them a bow tie at the same time.

I am very hoppy with the result (I could not resist).

Friday, April 2, 2010

Eggs!

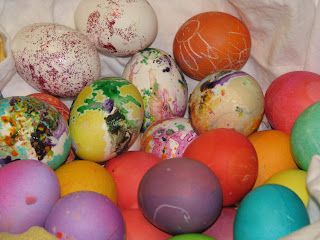
The egg coloring has begun. Crayons on hot eggs will slide around so nicely and create very pretty eggs. Much less mess than traditional dipping. Keep the eggs in the hot water after they finish cooking. Place a few eggs into an empty carton, the carton makes a perfect workspace that keeps fingers off the hot eggs. Experiment first to find a temperature that makes the crayon melt but will not burn if someone decides to pick one up. You can leave the eggs as they are, or dip them in some dye for a nice crayon resist affect. The melting sliding crayons are really nice to work with.  

Our lovely collection. Glitter glue with a paint brush was also a big hit.
I think these marbled eggs are so pretty. After you boil your eggs, roll them on the counter to crack the shell, but do not peel it. Then let them soak in egg dye in the fridge overnight. Then peel off the shell off to reveal the lovely marbled eggs inside. We only made a few because I am not such a big fan of eating colored eggs. One of these years I will look into making these with natural dyes. For now, they are really pretty and our dog enjoys an occasional egg treat.
One more thought--A tray of watercolor paint and a brush is a great way for 2 and unders to decorate eggs. Fill a carton with white boiled eggs and give him or her a paint tray, a brush and some water. Painting is easier than trying to dip and and wait. No spills and very satisfying:)

Thursday, April 1, 2010

A Little Bit of Easter

 I had intentions of posting tons of Easter projects, but then the sun came out and started to warm this place up! We have been enjoying the warmer days. We have a few puddles, lots of mud, melting snow, sunlight from about 7 AM until after 9 PM. We have seen and heard some new birds and spotted buds on the trees. We can be outside for extended periods without full winter gear, and geese were spotted in Delta Junction, a few hours south of Fairbanks...Spring is here! We still have snow on the ground and freezing nighttime temps, but for the most part, winter is a thing of the past.
I did want to post a few pictures of some of the things we have been doing around here to get ready for Easter before Easter is over.
Hollin came up with this game all on her own. She selected 12 plastic eggs and painted an empty egg carton to match each of the eggs. She poured and mixed every color, painted, and even counted how many of each color she needed. It has been a cute game to play with Waylon as he is just starting to learn colors.

My personal favorite...We just had some work done on our deck which resulted in a big pile of scrap wood in the driveway. Hollin made this adorable Easter Bunny using the wood scraps. Just a temporary creation.

Tuesday, March 23, 2010

Window Easter Eggs

We love decorating the house for holidays or to mark the change of seasons. Because it is more fun to arrange and rearrange than to simply put something up, I came up with an Easter craft that can be moved around a bit. 
We made these colorful Easter eggs for our windows the other day using white contact paper and permanent markers. I cut out a few egg shaped pieces and we sat down with the markers to decorate.

After the eggs were colored, we just peeled off the backing and stuck them on the windows. Contact paper sticks really well and peels off with no residue. Arranging the eggs on the window was a very fun job.
She came up with some lovely designs.
I designed an egg and Hollin made two more just like mine to try to trick me.