Monday, December 13, 2010

Cutting Wheatgrass

Oh Color Color Color, I have missed you. I have been sewing, knitting, crafting, and painting so much that I have not wanted to take a break to tell anyone about it. In fact, with all the turkey art around here, I cannot believe I did not post anything for Thanksgiving. I feel like a squirrel, I have a huge storehouse of images stored up for the darkest days of winter. Actually, these are the darkest days of winter. It has been very cold and dark. This is the time of year that I am ready for dinner by 3:00 and want to go to bed at 5:00. We can always use a little something green and alive this time of year. That is why I like to grow wheatgrass. We plant it, watch it grow, care for it and trim it. There is just something therapeutic about cutting the blades with a pair of scissors.
To grow wheatgrass you simply press wheat berries into soil. Water it and watch it grow. It comes up in a couple of days and grows fast. I suppose we could juice it or eat it too. But for now we will just continue to play.


Thursday, November 11, 2010

Owl Cake

I made this cake a few weeks ago for a cake auction fundraiser at my daughter's school. It was so cute and easy...and it got lots of bids) I found an image of an owl cake and tried my best to copy. I should warn you, you will have to tilt your head to view the last two pictures. For some reason they will not rotate, but I think it is worth the neck stretch.
I made a chocolate cake using two round pans. I cut one piece to look like the tufts on the top of an owl's head.
White frosting for the face and belly....

...Chocolate frosting along the edges. The feathers are sliced almonds, the beak is a pecan. I dusted two dried pineapple rings with powdered sugar for the eyes and the eyeballs are chocolate covered almonds.


Enjoy!

Monday, October 25, 2010

Luminated 3-Dimensional Jack-o-Lantern

A few months ago a stumbled across this great idea via the Artful Parent for making a 3D contact paper stained glass sculpture. I applied that concept to make this little guy for Halloween.

I made a circle with 20 gauge wire in the size I wanted the jack-o-lantern to be. I cut a larger circle of clear contact paper-- large enough to fold the edges of contact paper around the wire and have some room to make it 3-dimensional. Clear packing tape was necessary to reinforce the seams.

I made a face using black yarn, but I think it would have been cuter to let the kids draw a face with a Sharpie (or the yarn--their faces are always better). They stuck bits of tissue paper on the sticky side. Then we stood it up and pushed the contact paper around until it was the shape we wanted and able to stand on its own. We put a little LED tea lite behind him and it glows beautifully.

The LED candles have been a major source of entertainment the last few weeks. The lights are always being turned off so they can set up the candles.

I had to include this photo of our huge sweetheart, JJ. Always involved in, even if oblivious to, the action around him. At one point he had about four candles on him before he looked up.

Friday, October 15, 2010

Easy Kid Made Outdoor Ghost

We made this spooky little cutie last week using a stick, a plastic white table cloth, fiber fill, a pipe cleaner and a sharpie. We wanted to decorate the outside of the house with ghosts, but wanted something that would withstand the elements. This is easy and not messy.

We stuck ours in a flower pot, but they would also be cute in the garden.
First, find a stick. A straight stick is okay, a branchy stick will create the illusion of arms or movement. A branchy stick is more likely to tear the tablecloth so be careful.

Gather your materials. You will need to cut the tablecloth so that it fits the stick you are using. A round piece will make a softer bottom edge. A square will work too, and is easier for a little one to cut.
Secure the bottom of the stick and add some fluff to the top. Plastic grocery bags make great stuffing too.
Center the tablecloth piece over the fluff.

Twist the neck tight with a pipe cleaner.
Draw a face with a sharpie.


Monday, October 11, 2010

A Few Things I Want to Try


These pictures are totally unrelated to this post, but I could not resist.

There are so many incredible ideas out there. One of my favorite late night treats is to navigate my way through blog land and get inspired. I know, that might sound pretty lame, but chances are if you are reading this, you have similar interests. By the time I get the kids to bed and finish all the lunch making, dish washing, clothes folding and mess cleaning I am really too tired to do much else. It actually works out well. My husband is in his Netflix world on the couch. I am sitting across the room in heaven reading about sewing projects I will someday do and new ways to use chalk. We both have a glass of wine and exchange occasional smiles. The first snow of the season is on the ground, the house is cozy... life is good!


So about those ideas. I am presently inspired by many things, but will only share a few. I love  MaryAnn F. Kohl's Dark Sugar Chalk. I did try this while Hollin was at school and Waylon was napping. I did not take pictures, I figured I should really let the kids have a chance. It really is fun.

Zakkalife has a beautiful idea of switching from paper to leaves as a painting surface.

I love this sweet drawing book from Paint Cut Paste. A beautiful way to keep and treasure the many drawings made by your child.

The Mother Lode is truly loaded with good stuff. I especially love this embroidered family hands project.

I really want to get some little ones together and make some paper shapes like the ones featured on The Artful Parent.


And there is so much more out there!


Saturday, October 9, 2010

Alexander Calder Inspired Bat Mobile

I have long been an admirer of Alexander Calder and his colorful, fun whimsical work. He strikes me as someone who was a quirky and interesting person to know. He is probably most famous for his mobiles and stabiles. In fact, you really cannot teach, learn or even think about kinetic art without discussing Calder. When making mobiles, I try to replicate (in a very stretched sense) the way that Calder would balance each piece when choosing where to add the next. Little ones do not need to merely hang various lengths of string from coat hangers to make a mobile, it is much more interesting to build and balance from the bottom up.
This mobile is holiday themed and a bit on the hokey crafty side, but I think the structure redeems it. I cut out the wings and bodies. Hollin glued them together and added faces, mango trees, night vision and more. Some are flying, others sleeping. Bold colorful shapes can easily take the place of bats--actually anything can work!
We used:
5 paper bats made with black construction paper and decorated with crayons
4 pieces of wire (20 gauge) between 14" and 8" (does not need to be exact)
pipe cleaner for a hook (and extra cut of wire would work too)
hole punch
wire cutters
pliers
I pulled out some other metal bending/ working tools, but really, the pliers and cutters are all you need.

1. Gather materials and make your bats and punch a hole in each bat where you want it to hang from.
2. You will be building the mobile from the bottom up. Use your longest piece of wire and attach a bat to each end. This is the only piece of wire that will have two bats. All the others will only have one. Be careful not to tear through the paper around the hole. The pliers help make a nice loop in the wire. Pinch and close it up tight. You may need to help make sure the bats are attached securely.

3. Using your finger, find the point where the wire balances (does not slide off your finger onto the floor).

4. Make a loop in the wire in that spot.

5. Select another piece of wire. This time, attach one end to the loop you just made.

6. Carefully attach the third bat to the end of the newly attached wire.

7. Now find the balance point by placing your finger under the wire with the bat (number 3) you just attached. Make a loop in that spot. Attach the next piece of wire and then the next bat. You just keep repeating this process until you are finished.

Once you have used up all of you bats and wire, find the balance point on the top wire, add a loop and attach a hook. We hung our mobile on the light over the kitchen table. It is very light and delicate and spins around slowly and gently.


It all sounds a bit complicated but t really is not. The balancing is great fun for the little ones and a great way to throw some science into your day.
Enjoy your weekend. This may be our last snow free weekend for awhile so I think we will be playing in the leaves.

Monday, October 4, 2010

An Autumn Collage

Nothing Earth shattering here. No new groundbreaking idea. Just my boy, some contact paper and a beautiful fall day.
Leaves, petals, grass...some tissue paper found its way out here too.

He is enjoying the light shining through.

Yes, he is kissing his creation.

And hugging it... (his cuteness is unreal:))


We hung it on the garage door to brighten the view once those leaves are all gone!

This was actually done a few weeks ago and it is a good thing it was. Things are not so green anymore, most of our leaves are gone. The marigolds have withered and our days to play outside without mittens and hats are numbered. Brrr. The thought just gave me a chill.


Friday, October 1, 2010

Upcycled Plastic Lid Ghosts

A few months ago we made upcycled plastic lid flowers from the tops of yogurt containers and random lids that had lost their mates. It only seemed right to make something festive for fall using our never ending supply of plastic lids.
First, I cut the edges off the containers to make them easier to work with. Next I cut out ghostly shapes. You could have your child cut the ghost, I just went ahead and cut them for this project.
Hollin used Sharpie Paint Markers to add details. I had imagined boring black eyes and a mouth (you can see the very simple one I made in the first photo). I should have known better. These ghosts have hair, dresses and bows.
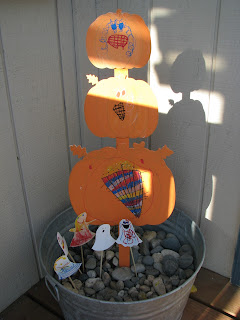
Here they are all together on the porch. We used clear packing tape to attach a wooden skewer to the back. Sticking them in the bucket and arranging them was a project in itself. As you can see there is also a lovely three headed pumpkin man in the pot. That was a pre-fab wooden craft decoration painted first with orange acrylic then decorated with the paint markers.
What do you do with your plastic lids and containers? I would love some new ideas.
Thanks.

Wednesday, September 29, 2010

Markers + Salad Scraps = Art

I love that fact that my artsy 5-year-old pulled the end of a freshly chopped celery stalk off the counter while I was making dinner to print with.

She used markers, a sheet of paper from our reusable art paper and something I was going to throw in the compost heap.
I love it:)

Saturday, September 25, 2010

A Changeable Wreath

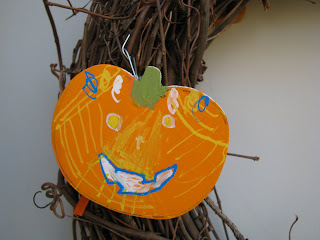
Hollin decided that we needed a wreath for our front door. She wanted a Halloween theme. This is one of those somewhat homemade, somewhat pre-fab projects. I am the type who always wants to make the wreath and every accessory, but cannot always pull it off. As much as I wanted to collect the twigs and make the wreath and every accessory, it just made more sense to buy some things at the craft store.
We bought the wreath and the little wooden shapes. I also picked up a set of Sharpie Paint Markers. They were really fun and easy for a five-year-old to use. She had more control with the markers than she would have with a brush and was able to feel really proud of her work.
Instead of making a new wreath for every special holiday or season, I decided to make a changeable one by attaching little wire hooks to the wreath.

I used hot glue to attach little hooks to the back of the wooden shapes (not much planning here, I cut some pipe cleaners up and twisted them into hooks). The "ornaments" can be arranged on the wreath. We can then make turkeys, gingerbread men, hearts, eggs and so on to have a festive wreath all year round.


Friday, September 17, 2010

Little Blue and Little Yellow

Although I do not often post about books we read, I am one of those parents you do not want to be behind in the library line. We go about every week and fill a really big bag with books. We read a lot. Sometimes we just enjoy the story, sometimes we get inspired. Leo Lionni is one author/ illustrator who almost always inspires me. His books are simple and sweet enough to hold the interest of a toddler, yet intriguing enough for an older child to want to read again and again. His illustrations truly show what an artist he was.
My two and a half-year-old loves the book Little Blue and Little Yellow. It is a very simple and beautiful story about two little friends, who happen to be splashes of color, and what happens to them when they hug.
I will not give it away, as I am pretty sure you now what will happen when they hug.

What a perfect story to lead into some color mixing fun. Just a squirt of blue and a squirt of yellow. It took about 5 seconds for him to make the colors hug and blend to make green.
I love the scratches he made with the back of his paintbrush.

Monday, September 6, 2010

Found Object Art

My favorite thing about making art with found objects is that there is no limit on the possibilities. You can use anything to make anything. You can save it, leave it alone, knock it down or blow it away. The other thing I love about it is that it can just creep up on you when you least expect to be making art.
For example, your kids might come across an interesting assortment of bolts, washers and a dead fly or two and get to work making....
 a "Tower"...
a "Train"...
"Butterflies"...
and just a cool thing that turns.
My kids stumbled upon this stuff at their grandparents house last month and just started to make stuff with it. There was no planning, no set up and hardly any clean-up. They just wanted to show everyone the treasures they made. I am happy had my camera.