Wednesday, December 16, 2009

Making Magnets


I just finished making a big batch of these lovely magnets to give to a few people on my Christmas list. I really like the way they came out. I actually feel compelled to make about 30 more because I love the way the entire group looks on my fridge (so much prettier than plastic letters and numbers!) I have seen these magnets at bazaars and decided to give it a whirl. They are functional and can be given to just about anyone on your list (who can't use a pretty magnet?). They are inexpensive to make, you need only fabric scraps, glass bubbles, magnets, Mod Podge and a glue gun. They are small and easy to travel with or to mail, and they are so pretty! Does that make them the perfect gift to make? I think so.


So how do you make these?


  • Gather your supplies--Mod Podge, large(about 1")glass bubbles, fabric scraps, paint brush, magnets, glue gun. You can find all of these supplies at a craft store. The glass bubbles are in the floral section.


  • Cover your workspace. I don't have an art studio (sigh) so I am constantly creating mobile work spaces. I used a cookie sheet covered in wax paper for this so that I could grab it when I had a few minutes to work, and put it out of the way when I needed my kitchen to be clutter free.


  • Make sure your bubbles are clean and dry. I noticed that many of them had imperfections on the backside that would interfere with the design. So I weeded those out or used them with a fabric that complemented the scar.


  • Lay the bubble on a fabric scrap and trace. Cut it out so that it is touch smaller than the line you traced (just inside the line).


  • Paint the flat side of the bubble with Mod Podge and press the fabric circle onto it, pressing firmly and making sure there are no air bubbles. Coat the back with another coat of Mod Podge, being sure to seal the edges.


  • Allow it to dry, then trim any edges that are not neat, then apply another coat of Mod Podge to the backside.


  • When it is dry, use a glue gun to secure a magnet, pull off any glue gun strings, wipe it clean and you have a very pretty magnet!

Sunday, December 13, 2009

Recycled Christmas Trees

Hollin made this at Sunday School this morning and I love it! What a great way to reuse liquid laundry detergent tops. The lid is stuffed with coiled cardboard and the stem/ trunk is a coffee stirrer. The kids stuck stickers to a paper cutout and then taped it to the coffee stirrer.

So simple and she loves it.

Sunday, December 6, 2009

Snow Family

Here is another one from the Christmas box. Again, I don't have pictures of the process, but I may make a few more this year (I believe I have a baby or two to send out) and if I do I will post instructions. I started making snow families about 10 years ago--I gave them as gifts to friends and family. A cute personalized gift that I hope the recipients enjoy every year. They are paper mache over newspaper and masking tape armatures. I use white paper towels with the paper mache glue so that I do not have to paint them (saves a step and looks really nice) The carrot noses are made out of polymer clay and everything has been assembled with a glue gun. My family is in need of a few repairs (the trip from MD to AK took a toll on them). The kids love these and like to play with them. I think it is fun for them to have a "doll" of themselves. You can add little features to characterize each family member a bit more. I would like to put a princess scarf og Hollin and a truck scarf on Waylon. Nothing is ever really finished...


Saturday, December 5, 2009

Tree Topper

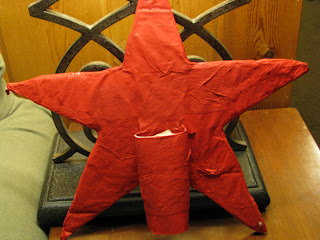
Hollin and I made this tree topper two years ago, when she was 2 and a half. We made it out of cardboard, a toilet paper tube, paper mache, some red paint, glue and little "jewels". I absolutely love it and hope it will be our topper for years to come. I still remember her chubby little hands gluing on the jewels while we talked about our new baby who was to arrive after Christmas. The best part is that she still considers it a masterpiece--the perfect topper to our tree. I don't have photos of the process, but I will describe it. Let me know if you need more detailed instructions to make one for your tree.
  • First cut a star out of a piece of sturdy cardboard. Glue a toilet paper tube to the back the tape it on securely with masking tape.
  • Tear a white paper towel into strips. Mix up some paper mache glue. You can do this several ways, I suggest using Elmer's Art Paste for paper mache.
  • Cover the entire thing with 2 layers of wet (with art paste), but not dripping, paper towels and allow to dry.
  • Paint.
  • Decorate.
  • Put on your tree every year:)

Thursday, December 3, 2009

Noodleflakes

This noodleflake ornament evolved from the snowflakes in my last post. After making sparkly snowflakes, http://http//alwaysarting-colorcolorcolor.blogspot.com/2009/11/sparkley-snowflakes.html I thought I would try to make something similar for the Christmas tree. This is what I came up with. These were made by gluing uncooked noodles to a plastic yogurt lid, then popping it off once dry, adding a bit of glitter and a ribbon...So pretty!


The key to making this ornament is to use a TON of glue. Squeeze the glue into the lid so that the entire lid is coated in a layer of glue. Then press the noodles into the glue, really pack them in tightly. I tried making these in various patterns and found that unless they are packed together tightly they will fall apart. So, I suggest making a round noodleflake. Allow the glue a day or 2 to dry, then simply pop it out of the lid. Add some glitter or glitter glue, string a ribbon through a hole and put it on your tree.


You can glue first and paint later, or paint first. I like to paint first. Painting the noodles this way is really fun. Choose your color. We used white and a tiny touch of blue. Squeeze it into a container with a lid.

Add noodles, close the lid, and let your little helper shake it up. You can also place a blank index card inside and let the paint and noodles "paint" the card for you. It makes a nice design.

Once the noodles are coated in paint, spread them out on some waxed paper to dry or just get started. Using wet noodles will result in messy fingers, but it can be done.

Don't forget to add glitter. Brush with glitter glue or with glue and sprinkle on the glitter.

Wednesday, December 2, 2009

Sparkley Snowflakes

We moved into our new house, had a wonderful visit from Grammy, and then my husband left for what will be almost 4 weeks (12 days to go!) The shock of it all has kept me from the computer, but I think it is safe to say I am back and in full on holiday art mode! My art space is starting to take shape in our new house and I can finally access all of our materials. It is not perfect yet, but it is going to be. We have made, are currently making, and will be making tons of fun projects. December always creeps up on me and leaves our house in a crafty disarray. We have glitter on the counters, gingerbread in the oven, and popsicle stick creations on the table. The first thing I want to share is a beautiful little snowflake made with wagon wheel pasta (uncooked of course).


To make this you need:


  • card stock


  • glue


  • marker


  • wagon wheel pasta (uncooked!)


  • white tempera paint


  • paint tray and brush


  • white glitterWe are fortunate here in Alaska to get a close look at snowflakes pretty regularly. We have been able to see that they are all different and that they have symmetrical patterns.

Start by drawing a simple snowflake shape on white card stock with a marker.


Next, glue the pasta over your lines.


Now sing a song, go outside, have a snack--do something for at least 10 minutes to let the glue set.


Paint with white tempera, brush with glue, sprinkle with glitter, shake off excess and you have a very lacy and very lovely snowflake.


Doing this with a group will result in many different designs. I must warn you that you will likely see more wagon wheel pasta projects in the coming weeks. I have never been much a the noodle art type, but I have been having fun adapting this activity.