Showing posts with label functional. Show all posts

Saturday, February 26, 2011

Upcycled Party Gift Box

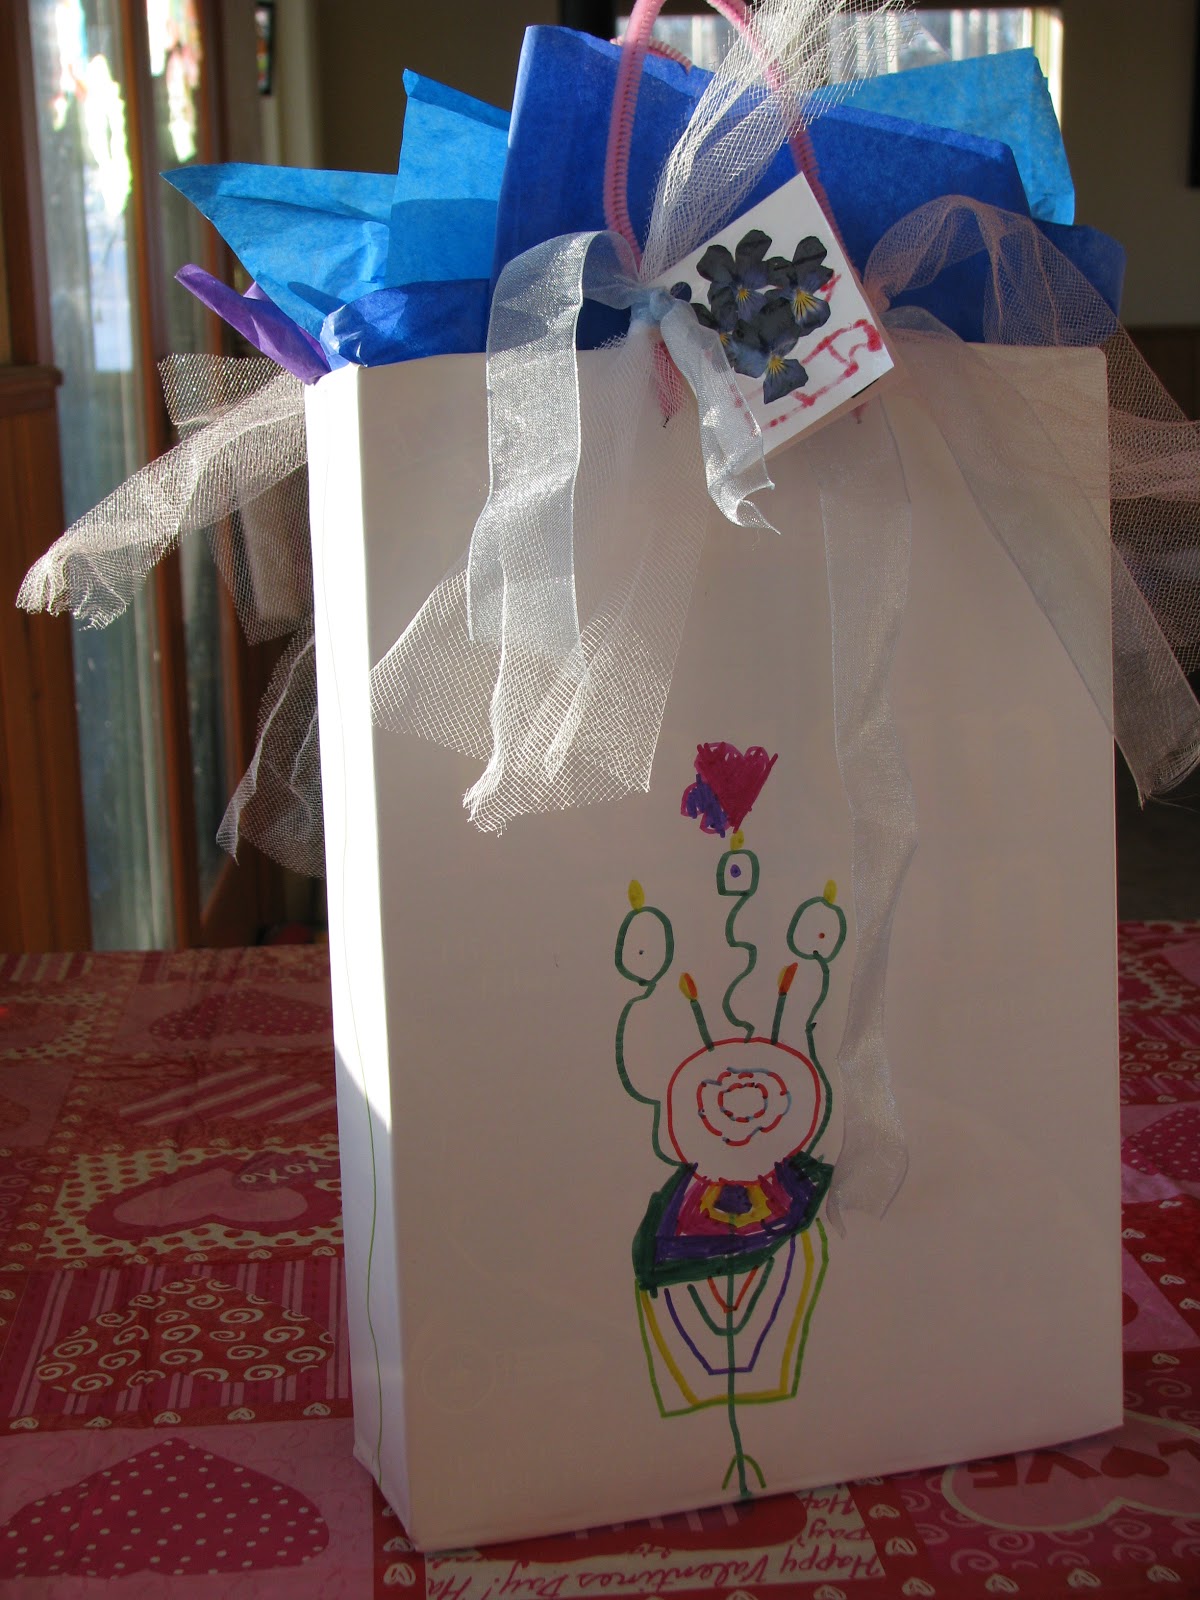
We made this gift box for a friend's birthday party the other day. It is made from a cereal box. I have seen this done using gift wrap to cover a box. We covered ours with white contact paper and decorated it with permanent markers.
Cut the top flaps off a cereal box and wrap in contact paper.
Poke two holes on the top, both sides, for handles. We fastened a pipe cleaner handle to each side.
We tied tulle and ribbon to the handles to make it fancier, then Hollin drew birthday designs on each side with permanent markers.

We added the gift, which was a lovely assortment of art supplies, some tissue paper and a little card.
So sweet and personal. We gave new life to an old box, and saved $ on a gift bag.

Saturday, August 28, 2010

Sponge Painting with a Twist

Wow. I have been away from my blog for over a month now. Between a very long vacation and the start of school something had to give! But we are now getting into the swing of things and I am back! This very rainy day is also helping to keep me inside. The days have been so lovely that working in front of the computer is nearly impossible. I just hope there is someone out there still interested in what I have to share.
In most instances I would say that sponge painting does not excite me very much. It gets on fingers and the spongy prints make me think of a home decorating attempt gone bad. But I discovered that a sponge as a vehicle for printing can be a pretty cool thing. We used ours as gift wrap.
You need paper, a sponge cut into the shape you want to use, tempera paint, squeeze bottles with a small opening, a printing plate (I used a plastic yogurt lid).

Squirt the paint on the printing plate. Press sponge onto paint. Print. Repeat.


I wish I had taken a picture of the wrapped present--it was so very pretty! I think this would be great to do with older kids as well--they could make more detailed squirts to print.

Friday, June 25, 2010

Mailbox Makeover


Yikes...seeing it in a photograph really makes me wonder how and why it took 8 months to replace our mailbox. A new home is always full of so many projects, big and small and somehow the mailbox was overlooked for quite some time. I am not so concerned with the wild and woodsy growth around the mailbox that would look very out of place in many communities. It would be very unusual to have a manicured lawn where we live. But the paint-peeling, attached to the post by a bungee cord mailbox, could not be ignored any longer. At first I thought we would strip and repaint this mailbox, but decided to start with a fresh clean white new one.
I love when we can create something functional that the kids can contribute to. These projects are not only the most fun, but are so meaningful. What better way to tell your child you think they have good ideas or you like they way they paint than to allow them to paint the mailbox or a similar project. I felt like I was able to tell my 5 year-old the "I trust you and your ideas and think you are really creative capable of important things" with this project...yet I was still able to control it a bit.
I realize that sounds a bit manipulative, but I had to find a balance. If I let it totally be up to her we would end up with a pooping moose or worse, a Disney Princess mailbox. But with a little bit of conversation and brainstorming, she happily came up with the bear in the blueberries. I painted the branches and then gave her a round and a leaf shaped sponge for the berries and leaves. She drew the bear with pencil first then painted it. I did some little touch ups and now we have a super cute mailbox.It is basically the same design on both sides.......with a cheery surprise for the mail carrier inside.

I used acrylic paint directly on the metal mailbox and sealed it with a clear spray paint to seal it. We actually made this as a Father's Day surprise and Daddy loved it. We have received lots of compliments which have been very well received. I love the way she wants to show our friends and loves to go fetch the mail. She talks about what the neighbors must think of it and has been talking about inventing a roaring bear sound effect.
This project turned out to be so much more than simply painting a new mailbox.
How does your mailbox look? I bet your kids would love to paint one!

Wednesday, June 23, 2010

More Magnets

A few months ago I wrote about making magnets
I made some more last month only this time I used little drawings and photographs as well as small pieces of fabric. Each magnet is representative of an experience or place and collectively they tell the story of the places our family has lived in the last 10 years. My husband and I met in college in Virginia, moved to Maryland, then to Alaska, Georgia, Michigan, back to Maryland and finally back to Alaska. Each place became home--we made friends, took walks and bought groceries. Each time we would move I felt a strange longing for the aisles of a former grocery store or the familiar streets where I would walk. Missing people is a given, but I wanted to honor in some way the places and experiences that are so significant to daily life, but when you move away are simply not to be part of your life any longer. 
A few of the pieces are bits of old curtains that used to hang in our windows, some are representational drawings of particular places or objects and a few are a bit more abstract as I tried to capture the sounds and smells that connect me to a place.
Most of the time they live on the refrigerator but they can also be a fun toy for little hands.
Regretfully I did not take any pictures, but Hollin did make some of these for her teachers as an end of school year gift. She drew some cute pictures and designs. They were really cute.
Thanks for looking:)

Saturday, May 8, 2010

A Garden Flag

I love the way this turned out. I bought half a yard of rip-stop nylon and hemmed the edges, making a thick fold over on the top to hang on the post. I am not sure what "rip-stop" actually means. I thought it would not fray, but it frays like mad and would be a real mess if left unhemmed. I was able to make two small flags (we are saving the other one for a rainy day) with a half yard. Sorry I don't have specific measurements, I just made sure it would fit on the flag stand we purchased.
Hollin drew a design with a black Sharpie directly onto the flag. I went over the lines to even them out a bit. She used watered down blue acrylic for the background and acrylics (not watered down) for everything else. When it dried we traced over some of the lines and made some spots on the ladybugs (she only wanted one to have spots). It has rained since we put it outside and is holding up great.
I have a thin yellow plastic table cloth and I am thinking about using it to make something similar. I am not sure it will last very long, but might be a fun way to reuse the tablecloth.
 Anyone ever paint on plastic tablecloths before? Or use them to make kites, flags, banners, etc.?

Thursday, January 28, 2010

Saving Space

I am always looking for creative space saving ideas. With limited drawer space in the bathroom, I decided to try to utilize some wall space and create a more usable drawer. Previously, I kept my daughter's barrettes in little bowls in the drawer. I tried to keep them separated and organized, but despite my best efforts, they always ended up taking over and we could never find what we were looking for. I had seen lots of cute barrette holders, and started out with grand plans for crafting something extravagant. The problem with extravagance combined with 4-year-olds, is that you end up spending way too much time on something that may or may not be well received. So I made this instead. I secured a piece of fabric around the glass of an empty picture frame then secured two pieces of ribbon to the back, allowing them to hang in front. I put the "glass" back in the frame. The ribbon pieces inside the frame are loose enough to manipulate and there is plenty of hanging ribbon to accommodate our barrette collection. I added a little string to the top so it could hang on a nail or hook. Hollin and I put the barrettes on the ribbons together. So far I like it. I was afraid it would look too cluttered on the wall, but it does not feel that way at all. The best thing about it is that she wants to put her barrettes back when she is finished with them and the drawer is now home to a little box of headbands, a comb and some detangler---ahhhhh.


I was having a similar problem with earrings. I have always kept them all in a pretty little box (gift from a good friend for being a part of her wedding). The box was just getting too crowded. So when my sister recently shared the idea of using a crocheted doilie on an embroidery hoop as an earring holder--I stole the idea right away:) The pretty little box is still home to my non- dangly earrings and is much less cluttered. Embroidery hoops are super cheap, probably less than a dollar new, cheaper at thrift shops (where there are always an abundance of them!). I picked up the doilie at a craft store for $.99.


I even found free labor to arrange the earrings.


Wednesday, December 16, 2009

Making Magnets


I just finished making a big batch of these lovely magnets to give to a few people on my Christmas list. I really like the way they came out. I actually feel compelled to make about 30 more because I love the way the entire group looks on my fridge (so much prettier than plastic letters and numbers!) I have seen these magnets at bazaars and decided to give it a whirl. They are functional and can be given to just about anyone on your list (who can't use a pretty magnet?). They are inexpensive to make, you need only fabric scraps, glass bubbles, magnets, Mod Podge and a glue gun. They are small and easy to travel with or to mail, and they are so pretty! Does that make them the perfect gift to make? I think so.


So how do you make these?


  • Gather your supplies--Mod Podge, large(about 1")glass bubbles, fabric scraps, paint brush, magnets, glue gun. You can find all of these supplies at a craft store. The glass bubbles are in the floral section.


  • Cover your workspace. I don't have an art studio (sigh) so I am constantly creating mobile work spaces. I used a cookie sheet covered in wax paper for this so that I could grab it when I had a few minutes to work, and put it out of the way when I needed my kitchen to be clutter free.


  • Make sure your bubbles are clean and dry. I noticed that many of them had imperfections on the backside that would interfere with the design. So I weeded those out or used them with a fabric that complemented the scar.


  • Lay the bubble on a fabric scrap and trace. Cut it out so that it is touch smaller than the line you traced (just inside the line).


  • Paint the flat side of the bubble with Mod Podge and press the fabric circle onto it, pressing firmly and making sure there are no air bubbles. Coat the back with another coat of Mod Podge, being sure to seal the edges.


  • Allow it to dry, then trim any edges that are not neat, then apply another coat of Mod Podge to the backside.


  • When it is dry, use a glue gun to secure a magnet, pull off any glue gun strings, wipe it clean and you have a very pretty magnet!

Sunday, October 11, 2009

Leaf Rubbing Gift Wrap


I had not intended to create a post about this, but I love it so I thought I would share. We had a little gift to wrap yesterday and we used a leaf rubbing for the papper and a leaf for the card. So simple.