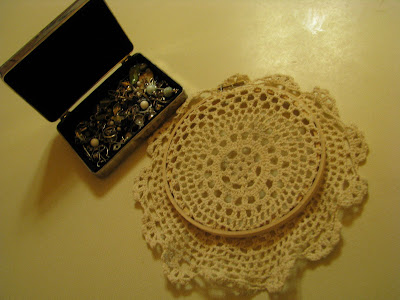
I was having a similar problem with earrings. I have always kept them all in a pretty little box (gift from a good friend for being a part of her wedding). The box was just getting too crowded. So when my sister recently shared the idea of using a crocheted doilie on an embroidery hoop as an earring holder--I stole the idea right away:) The pretty little box is still home to my non- dangly earrings and is much less cluttered. Embroidery hoops are super cheap, probably less than a dollar new, cheaper at thrift shops (where there are always an abundance of them!). I picked up the doilie at a craft store for $.99.
Thursday, January 28, 2010
Saving Space
I am always looking for creative space saving ideas. With limited drawer space in the bathroom, I decided to try to utilize some wall space and create a more usable drawer. Previously, I kept my daughter's barrettes in little bowls in the drawer. I tried to keep them separated and organized, but despite my best efforts, they always ended up taking over and we could never find what we were looking for. I had seen lots of cute barrette holders, and started out with grand plans for crafting something extravagant. The problem with extravagance combined with 4-year-olds, is that you end up spending way too much time on something that may or may not be well received. So I made this instead. I secured a piece of fabric around the glass of an empty picture frame then secured two pieces of ribbon to the back, allowing them to hang in front. I put the "glass" back in the frame. The ribbon pieces inside the frame are loose enough to manipulate and there is plenty of hanging ribbon to accommodate our barrette collection. I added a little string to the top so it could hang on a nail or hook. Hollin and I put the barrettes on the ribbons together. So far I like it. I was afraid it would look too cluttered on the wall, but it does not feel that way at all. The best thing about it is that she wants to put her barrettes back when she is finished with them and the drawer is now home to a little box of headbands, a comb and some detangler---ahhhhh.
Wednesday, January 27, 2010
Contact Paper Resist
I can't resist a resist project (hee hee). We have been going a little crazy with hearts this week and I thought I would share this one. I cut the heart shapes out of contact paper. My little artist peeled off the backing and arranged them on a sheet of watercolor paper. She can cut hearts, and this would have been a good 2 part project, but sometimes it is nice to collaborate. She also drew a few "secret" hearts with a white crayon. Next come the paint--a nice wash of liquid watercolors. We peeled the contact paper off right away to reveal bright white shapes beneath.
Monday, January 25, 2010
Doilie Stencils
We had something of a Valentine's Day craft free-for-all this morning. I think these came out really nice and were very "ooooh, ahhh" inspiring. First we mixed up some tempera paint to get the colors we wanted to work with. Each kid got a large sheet of heavy white paper and a big paper doilie. Our doilies were pretty thin and worked just fine. The object is to hold the doilie still and paint over the pretty pattern. I had to help my 2-year-old hold it still. Once you finish painting, just lift up the doilie to reveal your lovely stenciled pattern.
Wednesday, January 20, 2010
Spool Snowflakes
Here is a quick and rewarding printmaking project for a snowy day. I hope you like it as much as we do.
I am a big fan of all types of gadget printing--especially for toddlers. To make snowflake prints, use white paint on a colored background, or make a pale blue paint and use white paper. I used tempera and card stock. First we mixed up some pale blue paint. (The mixing of colors alone is a great experience). Next, I gave my little guy some empty thread spools and showed him how to push the spool into the paint and then print on the paper.
Saturday, January 9, 2010
Happy New Year!
To most people, this is just a mess. But, to me, it is an early sculpture. These things were just laying around and he put them together so creatively.
My little boy turned two a couple of weeks ago. He is at a great age for getting into art. I like to just give him materials and let him go.
Chalk pastels plus paper plates plus toilet paper...no rules...both kids loved this.
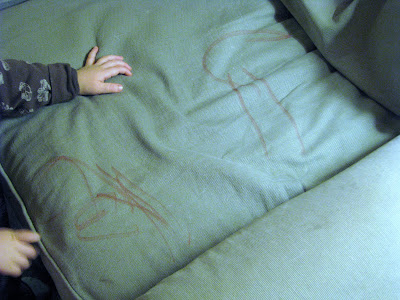
I am not a fan of the markers on the couch series, but if I don't make light of it, I may go crazy! This has happened three times now. Waylon has no problem getting the caps off the markers and feels compelled to draw on the couch. Luckily, the permanent markers are under lock and key these days and the washable ink comes right out--although I have had to take the cushion covers off and wash them. On the bright side, my couch has never been cleaner.
The coming months will be busy. I am still working through a very time consuming math course (why do I get myself into these things?) and I just registered for a drawing class. I am really looking forward to taking a studio course again. It has been a long time since I have been able to
get out and develop as an artist. It felt so good walking through the art department, there was an immediate connection. The courses, homeschooling pre-K, and everything else that comes with raising a family will keep me on my toes. I had been thinking that maybe I should take a break from my blog, but I saw that I have 10 followers! Not huge, but hey, 10 people (and possibly more) want to hear what I have to say. Thank you, I am so glad you are out there. You have inspired me to pencil in a weekly date for Color Color Color. Enjoy!
Like everyone else, the holidays have consumed me the last few weeks. We just got back from two wonderful weeks visiting family on the East Coast. The artistic highlight of my vacation was learning to knit, something I have wanted to do for a long time. (pictures of my first project should be available soon:). I have to say, I am feeling very relieved that the holiday craft madness has ended. It has been nice just letting the kids create art in their own way again, with much more freedom, which is what I think it is all about. Hollin has been spending a great deal of time coloring in her princess coloring books--not really "art", but it inspires her. I equate it to when I was in middle school and wanted to read nothing but Sweet Valley High books, that used to drive my mother mad because it was not "great literature". But, it spoke to me at the time and helped instill a love of reading. I have not read one in 20 years, but still have not read Pride and Prejudice because it was suggested so many times (although I think I am finally ready). While coloring books have no place in an art curriculum and should not be a substitute for creative expression, they can be a lot of fun. I hope my rambling makes some sort of sense!
The coming months will be busy. I am still working through a very time consuming math course (why do I get myself into these things?) and I just registered for a drawing class. I am really looking forward to taking a studio course again. It has been a long time since I have been able to
get out and develop as an artist. It felt so good walking through the art department, there was an immediate connection. The courses, homeschooling pre-K, and everything else that comes with raising a family will keep me on my toes. I had been thinking that maybe I should take a break from my blog, but I saw that I have 10 followers! Not huge, but hey, 10 people (and possibly more) want to hear what I have to say. Thank you, I am so glad you are out there. You have inspired me to pencil in a weekly date for Color Color Color. Enjoy!
-Gail
Subscribe to:
Posts (Atom)